My latest Project Life Style Video featuring simple tips to use those 'not-so-great' photos. Hope this is inspiring. Thanks for watching.


Feb 9, 2016
Scrapbook 100 photos in 1 evening - Session 4 & kit overview
This week I had some technical difficulties - I ended up losing the footage of my process of creating the layouts in this session. It happens. So I ended up doing a quick overview of each layout I got done and shared what is left in my kit - stash items that I want to use up.
Upon doing this challenge, I now have a better understanding of my stash - why some items tend to hang around and not get used. Even with this challenge, I am shying away from using certain papers and colors for one reason or another. This teaches me about myself and my scrappin' style. Though I may be getting a good deal at the time, or truly love how pretty something is - I have to really think, "will I use it?" It really doesn't do any good to have pretty things, or cheap things - sitting on a shelf. So far what is left in my kit, which I pulled from my stash - is lots of busy and bold/bright colored papers. Which I can truly say is a challenge for me. I think it's because I feel it takes too much attention away from my photos and I feel I have to hide it or it's so pretty I want to showcase it instead of my pictures. Either way, I know my struggle - it shows in what is left in my stash and it shows when I try to use it - I have a hard time.
If you can, take a moment to sift through some of your stash. Try to sort out items that you know you will never use, maybe it came in a kit or was an impulse buy. Then maybe sort things you love that you think is too pretty to use. Then sort by ones you know you'll use in the very near future. To get through your stash - I would suggest using up those items you chose knowing you would use them. Use them first. They may make it easier to create projects with. Then the pretty paper - cut it up - either into a 6x12 strip, 4x12 strips, or mutiple 6x6s. Once it's cut, you may be better inclined to use it up. The other papers that you know you will never use, it's not your style, the colors are not to your taste, or they are seasonal and you just held on to them too long - give them away. Donate to another scrappy friend, a school, or even a second hand store.
I hope this little bit of information may give you some inspiration to work through some of your stash. Thank you for sticking with me on this challenge - I have hit the halfway mark and getting more layouts done at one time than ever before and truly getting my photos out of the box and onto layouts. Not to mention, making a small dent in my stash too!
I hope you enjoy the video.
Upon doing this challenge, I now have a better understanding of my stash - why some items tend to hang around and not get used. Even with this challenge, I am shying away from using certain papers and colors for one reason or another. This teaches me about myself and my scrappin' style. Though I may be getting a good deal at the time, or truly love how pretty something is - I have to really think, "will I use it?" It really doesn't do any good to have pretty things, or cheap things - sitting on a shelf. So far what is left in my kit, which I pulled from my stash - is lots of busy and bold/bright colored papers. Which I can truly say is a challenge for me. I think it's because I feel it takes too much attention away from my photos and I feel I have to hide it or it's so pretty I want to showcase it instead of my pictures. Either way, I know my struggle - it shows in what is left in my stash and it shows when I try to use it - I have a hard time.
If you can, take a moment to sift through some of your stash. Try to sort out items that you know you will never use, maybe it came in a kit or was an impulse buy. Then maybe sort things you love that you think is too pretty to use. Then sort by ones you know you'll use in the very near future. To get through your stash - I would suggest using up those items you chose knowing you would use them. Use them first. They may make it easier to create projects with. Then the pretty paper - cut it up - either into a 6x12 strip, 4x12 strips, or mutiple 6x6s. Once it's cut, you may be better inclined to use it up. The other papers that you know you will never use, it's not your style, the colors are not to your taste, or they are seasonal and you just held on to them too long - give them away. Donate to another scrappy friend, a school, or even a second hand store.
I hope this little bit of information may give you some inspiration to work through some of your stash. Thank you for sticking with me on this challenge - I have hit the halfway mark and getting more layouts done at one time than ever before and truly getting my photos out of the box and onto layouts. Not to mention, making a small dent in my stash too!
I hope you enjoy the video.
Jan 30, 2016
Scrapbook 100 photos in 1 evening | Session 3 video
Wow! Each session seems to go faster and faster. This time around, I got 3 layouts done in less than 1 hour!! Truly a first for me! I am making great progress too with my box of photos. I see a small 'dent' forming and it feels so great to see the stack of completed layouts growing!
My first layout took the longest of the 3. I think its that time my head needs to get in the creative mood. I also decided to start with only 2 photos on this first layout - which also posed a challenge to 'fill up' or design the entire page when there was more blank space to deal with.
I made it through, with a fun and easy technique - faux paint splatters! I simply used my white gel pen to help fill the page and get the look of white paint. It turned out great and was quick and easy - no drying time required.
All in all, I am so happy with how far I've come along with this challenge. I am almost halfway through my 'one evening' time frame and I am so excited to see how much further I get along and what other new tricks or tips I will learn.
I hope you enjoy this video of my third session and I hope you like the layouts too.
Thanks for stopping by today!
My first layout took the longest of the 3. I think its that time my head needs to get in the creative mood. I also decided to start with only 2 photos on this first layout - which also posed a challenge to 'fill up' or design the entire page when there was more blank space to deal with.
I made it through, with a fun and easy technique - faux paint splatters! I simply used my white gel pen to help fill the page and get the look of white paint. It turned out great and was quick and easy - no drying time required.
All in all, I am so happy with how far I've come along with this challenge. I am almost halfway through my 'one evening' time frame and I am so excited to see how much further I get along and what other new tricks or tips I will learn.
I hope you enjoy this video of my third session and I hope you like the layouts too.
Thanks for stopping by today!
Jan 23, 2016
Scrapbook 100 photos challenge | Session 2 - video
I made it to the second scrapbooking session of this challenge and I have to say, I did much better than my first session. Each layout went quicker and I used more photos. And when I say quicker I mean QUICK! I can actually say I made a layout in 15 minutes!! Yes, I said 15 minutes!! This challenge has truly got me to do aMaZiNg things!!
(happy dance complete) :)
In this session, the photos I had were from one event - a camping trip. Even though all the photos were from the same time and event, I didn't make the layouts the same, nor do they match each other. I don't think that is necessary to do - I see each layout as unique and work with them as individual pages. Even though I still had the same kit of supplies to choose from, each layout turned out different from each other and I was able to use designer paper that was in my stash for a long time. So multiple successes here.
 I discovered this time around that the more photos you have on one layout - there is less room to embellish. This may seem like an obvious observation, but I typically only scrap 1-3 photos on a layout - so to scrap more like 6 on one layout is new for me. This simple reality I think helped make these layouts a snap to put together...of course along with having my pre-chosen supplies and a base sketch to go off of.
Two sessions down, I've only used up 2 hours and 15 minutes of my 7 hour challenge, and I have put 24 photos on layouts - out of the 100 goal. I think I'm moving along well.
Check out my video below to see session 2 and how my layouts turned out. Thanks for stopping by and I'll see you in my next session of this challenge! Get scrapping!
(happy dance complete) :)
In this session, the photos I had were from one event - a camping trip. Even though all the photos were from the same time and event, I didn't make the layouts the same, nor do they match each other. I don't think that is necessary to do - I see each layout as unique and work with them as individual pages. Even though I still had the same kit of supplies to choose from, each layout turned out different from each other and I was able to use designer paper that was in my stash for a long time. So multiple successes here.
I discovered this time around that the more photos you have on one layout - there is less room to embellish. This may seem like an obvious observation, but I typically only scrap 1-3 photos on a layout - so to scrap more like 6 on one layout is new for me. This simple reality I think helped make these layouts a snap to put together...of course along with having my pre-chosen supplies and a base sketch to go off of.Two sessions down, I've only used up 2 hours and 15 minutes of my 7 hour challenge, and I have put 24 photos on layouts - out of the 100 goal. I think I'm moving along well.
Check out my video below to see session 2 and how my layouts turned out. Thanks for stopping by and I'll see you in my next session of this challenge! Get scrapping!
Jan 17, 2016
Scrapbook 100 photos Challenge | Session 1 - Video

- Deciding on the photos to use
- Sticking to the sketch
- Sticking to the pre-made kit of supplies
- Timing myself
- Making decisions and going with it
I found that if I stuck to the sketches and the items in my kit - I would have finished each layout more quickly. Each time I started looking through my stash or pulling stamps out - took time that I originally wasn't planning on spending. Some layouts just 'need' that little extra something though - which I'm okay with. But for this challenge I want to keep to my kit.
Now after this first session, I've added enameled dots to my kit as well as 1 alpha stamp set that also includes numbers. This I hope will minimize the time I'm spending searching for embellishments during my next sessions.
To see how I did - check out my video below. Overall, I'm very pleased with the outcome of this first session. I never made this many layouts in such a short time - EVER! It feels great! I know I'm going to have a great sense of accomplishment by the end of this challenge!
Jan 12, 2016
Scrapbook 100 photos in one evening | Supplies
Besides selecting my photos I then had to select what supplies I would use. I am trying to "bash my stash" this year, and I recently came across a Facebook group 2016 Bash Your Stash Challenge where they are encouraging us to use our stash and not purchase anything new for the entire year. Besides this motivation to use my stash, I also had this challenge to scrap my 100 photos in an evening so they went hand in hand - needless to say I am motivated to get scrappin'.

Here's what I chose to make my kit from my stash as I get ready for my 100 photo challenge.(see my previous post for my introduction of this challenge. Scroll below for introduction video.)
Since my photos do not match or go together, they cover multiple years and varying events. This adds to the complexity of making a kit that will work. To combat this I mostly stuck with neutral colors and patterns. I also tried to use papers that already matched with each other that came in a package together or are from the same product line. My newest products came from the 2015 Scrapbooking Expo last summer - so I still had new sheets that I had not yet cut into - so these were first on my list to add to my kit. Here's a photo of the papers I chose to work with. There are some pops of color which is fine but those brighter patterns are from a paper pad I got so I knew they would go together and I like having the option to add pops of color as I would like to when making my layouts.
 Now with my paper chosen, it makes it easier to select embellishments. Again, I tried to stick to neutrals. I dug into my alphabet letter stash and my number sticker stash - which are organized by color - and selected my gray, black, and white alphas. I also selected a few stickers that I thought would work too - color is the driving force here. Will they go together on a page well? That's what I was thinking about when making my selections. Not size, not brand, not anything else - just color.

I did not select 'actual' embellishments since I didn't really know what events my photos were covering - and I like to choose my accents more on the fly. When I make the layout, I see how much space I have, what the topic is about, and what color accent I would like. Since I will be in a time crunch, embellishments will be minimal, and we'll see how I do with selecting from my stash on the go or if I leave out embellishments all together. We'll just have to see how it goes. For my kit though, besides my sticker labels - these are the only pre-selected accents I have put together for this challenge.
After I have my scrapping supplies, it was time to get my tools together. Here is the list of my tools I chose to have in my kit:

Introduction Video
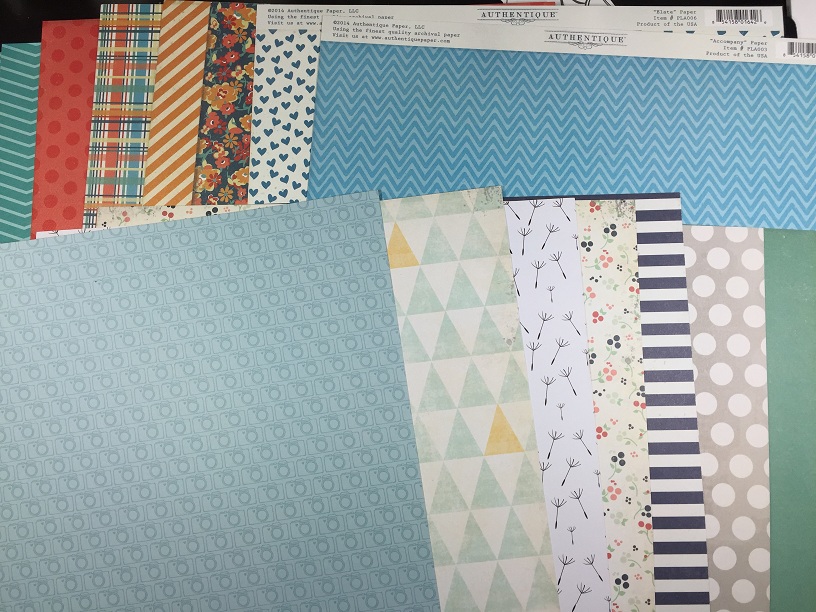
Here's what I chose to make my kit from my stash as I get ready for my 100 photo challenge.(see my previous post for my introduction of this challenge. Scroll below for introduction video.)
Since my photos do not match or go together, they cover multiple years and varying events. This adds to the complexity of making a kit that will work. To combat this I mostly stuck with neutral colors and patterns. I also tried to use papers that already matched with each other that came in a package together or are from the same product line. My newest products came from the 2015 Scrapbooking Expo last summer - so I still had new sheets that I had not yet cut into - so these were first on my list to add to my kit. Here's a photo of the papers I chose to work with. There are some pops of color which is fine but those brighter patterns are from a paper pad I got so I knew they would go together and I like having the option to add pops of color as I would like to when making my layouts.
 Now with my paper chosen, it makes it easier to select embellishments. Again, I tried to stick to neutrals. I dug into my alphabet letter stash and my number sticker stash - which are organized by color - and selected my gray, black, and white alphas. I also selected a few stickers that I thought would work too - color is the driving force here. Will they go together on a page well? That's what I was thinking about when making my selections. Not size, not brand, not anything else - just color.
I did not select 'actual' embellishments since I didn't really know what events my photos were covering - and I like to choose my accents more on the fly. When I make the layout, I see how much space I have, what the topic is about, and what color accent I would like. Since I will be in a time crunch, embellishments will be minimal, and we'll see how I do with selecting from my stash on the go or if I leave out embellishments all together. We'll just have to see how it goes. For my kit though, besides my sticker labels - these are the only pre-selected accents I have put together for this challenge.
After I have my scrapping supplies, it was time to get my tools together. Here is the list of my tools I chose to have in my kit:

- large Fiskars paper trimmer
- Scotch Advanced Tape Glider (ATG)
- Paper Snips scissors - from Stampin' Up!
- 01 American Crafts Precision Pen - black
- 03 American Crafts Precision Pen - black
- Uni-ball Signo white gel pen
- 2 way glue pen - Stampin' Up!
- Date roller stamp - from office supply store
- 0.3 Hi Tec C fine line pen - black
Introduction Video
Scrapbook 100 Photos in One Evening | Get Ready & Introduction Video
"Okay, hold up there. I know what you're thinking: "I can't scrapbook 100 photos in an evening." But before you...[dismiss] this idea; listen up! I, too, previously laughed off this unfathomable idea. "100 Photos? Seriously?" But that was before I learned the secret to guaranteed success...[a]ll you need is a formulated design strategy and a strong plan prior to "go" time." - Creating Keepsakes September 2011, p.43-55.
This was the opening statements in the article I found while I was purging my old scrapbooking magazines. This article was one that I actually folded the page down for me to refer to later, so now almost 5 years later, I'm getting back to this article and actually going to try it out. I am in that purging mode to clean out my stash and I came across an Iris container full of printed photos just waiting to be put in albums. This challenge came just in time and I hope you will follow me as I try to do this seemingly impossible challenge. I've never done anything like this before. I typically take 1-2 hours to create 1 layout and usually they have 2 or 3 photos at the most on each of them. So this will definitely be challenging, but I will try to follow the suggestions and see if I can do it. Yes, I can do it. I hope I can.
 First off, my interpretation of 'one evening' is about 6-8 hours. The article didn't specify how long one evening should be...but I think I'm safe if I go with 7 hours. Let's make that the challenge. Scrap 100 photos in 7 hours! Seems a bit out there, but I'm up for the challenge! Let's get these photos out of the box and into albums - yay!
Let's Get Ready... (directly from the Creative Keepsakes article)
This was the opening statements in the article I found while I was purging my old scrapbooking magazines. This article was one that I actually folded the page down for me to refer to later, so now almost 5 years later, I'm getting back to this article and actually going to try it out. I am in that purging mode to clean out my stash and I came across an Iris container full of printed photos just waiting to be put in albums. This challenge came just in time and I hope you will follow me as I try to do this seemingly impossible challenge. I've never done anything like this before. I typically take 1-2 hours to create 1 layout and usually they have 2 or 3 photos at the most on each of them. So this will definitely be challenging, but I will try to follow the suggestions and see if I can do it. Yes, I can do it. I hope I can.
 First off, my interpretation of 'one evening' is about 6-8 hours. The article didn't specify how long one evening should be...but I think I'm safe if I go with 7 hours. Let's make that the challenge. Scrap 100 photos in 7 hours! Seems a bit out there, but I'm up for the challenge! Let's get these photos out of the box and into albums - yay!
Let's Get Ready... (directly from the Creative Keepsakes article)
- Select a theme. Choose what type of layouts or album you want to create (i.e. year in review, holidays, baby, etc.)
- Select a design strategy. Choose a simple design that can be used and reused throughout your entire album. Keep it simple. Keep it consistent.
- Select a formula. Use one of our predetermined formulas or feel free to create your own. Whatever it is, write it down, and stick to it.
Get Set...
- Select photos. With your strategy in mind, review your photos, and select the amount called for in your formula.
- Print and trim photos. Since you have your design plan in place, you should know exactly at what dimensions to print and/or trim your photos.
- Select products. Use one collection or a kit to simplify the selection process and provide consistency throughout the album. I can't stress this enough! When you streamline your choices, you'll finish your pages in a fraction of your normal time.
- Pre-trim/pre-print items. If you know you'll need multiple pieces of the same item, pre-trim or pre-print them now.
- Gather tools. In addition to your scrapbook products, gather your paper trimmer, ruler, scissors, and lots of adhesive.
- Purchase an album or photo sleeves. Make sure you have the proper home for your completed project.
To see how I got ready and interpreted these steps - please check out my intro video below. I didn't follow these steps exactly. I explain further how I got ready in my video, so please check it out below. Check back for my next post to see the supplies I pulled from my stash to make my kit for this challenge.
Jan 4, 2016
Fauxbonichi page & Flip Through Video
As a scrapbooker, I found it difficult to stay up to date and record daily life and activities. I looked into Project Life and actually am using this form of album to create my son's baby album. But to use it as it was intended to document each day or week - is just unrealistic for me. I don't take pictures everyday and I don't have a way to print photos and scrapbook each week or daily. I didn't want to feel so much pressure of keeping up or having such a process added to my day to day or weekly routine. (I can barely squeeze in some creative time as it is)
Since May of 2015, I started a daily journal called a Fauxbonichi - since it is a fake version of the original daily journal called the Hobonichi.
 Needless to say, just having a notebook with blank pages ready to be filled in any format and with any medium I wanted, became the best thing I ever started! It filled my desire of wanting to document day to day activities as well as be a creative outlet where I could use my scrapbooking supplies, like stamps, stickers, markers, and paper. I absolutely love this simple method of documenting my life in a creative and fun way. The best part is, there are no rules. There is no template or format you have to follow. There are no tools or products you have to use. It's totally up to me. This has been a great place for me to use up my stash of products that have been sitting on the shelf because they just don't match or they are too big or too small to work on a scrapbook layout. A journal page doesn't have to match a photo or designer paper - it's a blank slate. So I've been able to use up random stickers and finally make a dent in my alphabet sticker collection.
Here is one of my latest pages I did for January 2 to give you an idea of what a page can look like. If you want to see more and get inspired to use up some of your stash and have a daily record of your life - check out my flip through below as well as others on my You Tube Fauxbonichi playlist.
You don't need anything more than a pen and a blank journal to get started. Any journal, any pen. Add as much as you like or keep it simple to just your handwriting on the paper. However you decide to make you pages - you are documenting memories that is always fun to look back on later. Plus, if you scrapbook some photos later - you will have a written record of the day for you to look back on! Bam! Instant journaling done for your future scrapbook layouts. I love that too!
I hope you are inspired. Check out my video for ideas and I hope you decide to pick up a pen and start your own daily journal. Have fun and thanks for stopping by!
Since May of 2015, I started a daily journal called a Fauxbonichi - since it is a fake version of the original daily journal called the Hobonichi.
 Needless to say, just having a notebook with blank pages ready to be filled in any format and with any medium I wanted, became the best thing I ever started! It filled my desire of wanting to document day to day activities as well as be a creative outlet where I could use my scrapbooking supplies, like stamps, stickers, markers, and paper. I absolutely love this simple method of documenting my life in a creative and fun way. The best part is, there are no rules. There is no template or format you have to follow. There are no tools or products you have to use. It's totally up to me. This has been a great place for me to use up my stash of products that have been sitting on the shelf because they just don't match or they are too big or too small to work on a scrapbook layout. A journal page doesn't have to match a photo or designer paper - it's a blank slate. So I've been able to use up random stickers and finally make a dent in my alphabet sticker collection.
Here is one of my latest pages I did for January 2 to give you an idea of what a page can look like. If you want to see more and get inspired to use up some of your stash and have a daily record of your life - check out my flip through below as well as others on my You Tube Fauxbonichi playlist.
You don't need anything more than a pen and a blank journal to get started. Any journal, any pen. Add as much as you like or keep it simple to just your handwriting on the paper. However you decide to make you pages - you are documenting memories that is always fun to look back on later. Plus, if you scrapbook some photos later - you will have a written record of the day for you to look back on! Bam! Instant journaling done for your future scrapbook layouts. I love that too!
I hope you are inspired. Check out my video for ideas and I hope you decide to pick up a pen and start your own daily journal. Have fun and thanks for stopping by!
Dec 31, 2015
Scrapbooking | one 5x7 photo - process video
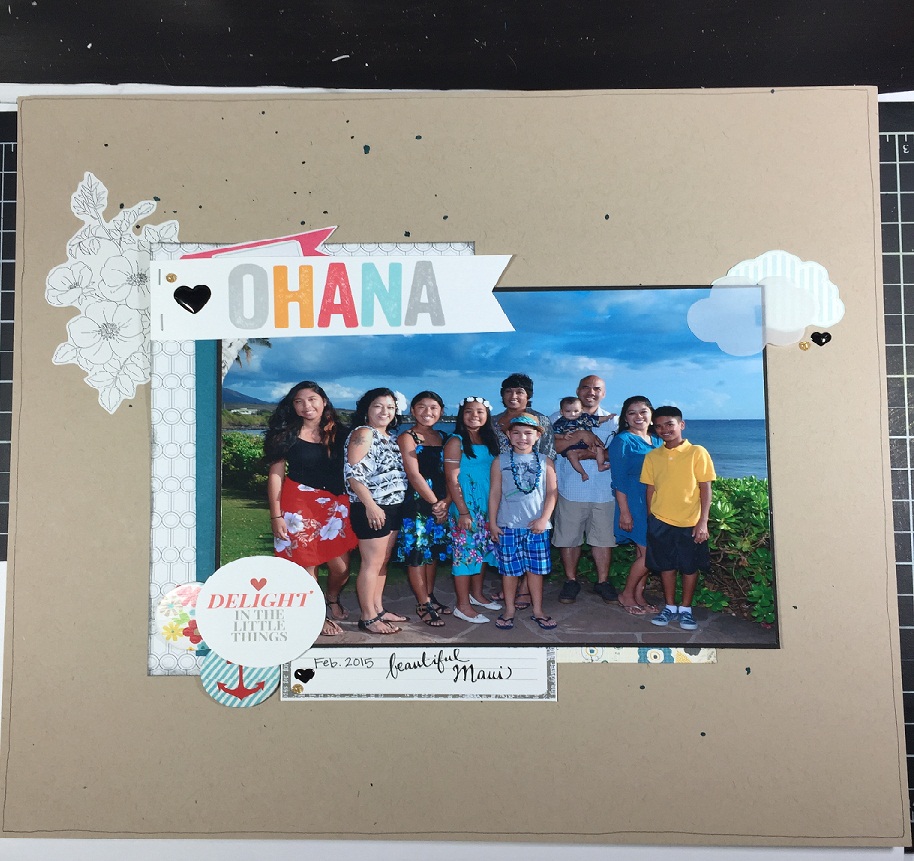
This layout came together quickly and easily - all using older products from my stash.
I haven't bought any new products for scrapbooking since the scrapbooking expo this summer. I finally put some of the items I got to use. This is a goal of mine for 2016 - I want to use up my stash of products and get more photos printed and put in albums.
I hope you will follow my journey as I strive to use my stash in this new year and get more layouts done than I have ever done before. In addition to traditional layouts, I am also working on my baby's one year Project Life baby album. I hope to use my stash on both these projects throughout the year. I plan on sharing my progress so stay tuned as I share some of my stash and how I use it up. Inspired by the Facebook Group I recently discovered: 2016 Bash Your Stash Challenge
For now, please enjoy the process video below. I appreciate any comments you have for me. More to come in 2016 - I'm looking forward to sharing my journey with you!
Dec 29, 2015
2016 is upon us
Well, it's no mystery that I have not been blogging. Life with a new baby has taken it's toll and my priorities have shifted - leaving my blog in the dust.
Now that a new year is upon us, I realized how much I failed this year with blogging. As I consider goals and review how I did on my previous goals I see I need a plan to keep up with all that I think I want to do next year, and blogging is one of those things.
I reviewed my goals for 2015 - which is horrible since I should have been keeping up with them throughout the year. Since my goals were not 'in front of me', I forgot what I had written down, and I didn't have a plan to reach them. So, needless to say, many of my goals went unachieved.
Now, with 2016 around the corner, I have to re-evaluate my goals. Do I want to simply carry over my same goals from this year that I didn't achieve or create new ones? What will be the plan to make these goals achievable?
As I posted previously, I have stumbled into the planner community. I discovered bullet journaling and truly feel this method will work for me. I also came across the Get to Work Book - which is a planner designed to help you tackle projects/goals and break them down into action items each week or month. I believe that if I combine these two concepts - I will actually achieve my goals and keep myself on track. With that said, what am I going to be reaching for this year?

Similarly for blogging - something once a week - I will plan a day and time each week of when I will do this. I hope this will keep me on track.
For the daily goals, I don't want to have to track it since I know I will get frustrated if I forget to mark it each day. So these, I will just have to keep myself accountable and try to pick a time each day I will do my reading.
So this is my initial plan for 2016. I decided to keep my list short this time to see if I can keep up. I hope with the exercising and new bedtime - I will feel better and have more energy to do more things for my own self development. I have a separate goal list for work which I will approach the same way - schedule time each week to work towards the goal and track my progress.
Keep an eye out for future posts of how my bullet journal is working out and how I'm doing with these goals. Hopefully you will see more posts from me and are still inspired by the projects I create.
Thanks for sticking with me.
Ezlie
Now that a new year is upon us, I realized how much I failed this year with blogging. As I consider goals and review how I did on my previous goals I see I need a plan to keep up with all that I think I want to do next year, and blogging is one of those things.
I reviewed my goals for 2015 - which is horrible since I should have been keeping up with them throughout the year. Since my goals were not 'in front of me', I forgot what I had written down, and I didn't have a plan to reach them. So, needless to say, many of my goals went unachieved.
Now, with 2016 around the corner, I have to re-evaluate my goals. Do I want to simply carry over my same goals from this year that I didn't achieve or create new ones? What will be the plan to make these goals achievable?
As I posted previously, I have stumbled into the planner community. I discovered bullet journaling and truly feel this method will work for me. I also came across the Get to Work Book - which is a planner designed to help you tackle projects/goals and break them down into action items each week or month. I believe that if I combine these two concepts - I will actually achieve my goals and keep myself on track. With that said, what am I going to be reaching for this year?

Here are my initial goals:
- Blog at least once a week. Share projects, ideas, and what I've been up to.
- Finish Nathan's first year baby album. Currently on week 9.
- Exercise once a week - 1 hour minimum
- Bedtime: no later than 11:30pm
- Read the Bible and daily text - daily
- One cup of coffee a day
Similarly for blogging - something once a week - I will plan a day and time each week of when I will do this. I hope this will keep me on track.
For the daily goals, I don't want to have to track it since I know I will get frustrated if I forget to mark it each day. So these, I will just have to keep myself accountable and try to pick a time each day I will do my reading.
So this is my initial plan for 2016. I decided to keep my list short this time to see if I can keep up. I hope with the exercising and new bedtime - I will feel better and have more energy to do more things for my own self development. I have a separate goal list for work which I will approach the same way - schedule time each week to work towards the goal and track my progress.
Keep an eye out for future posts of how my bullet journal is working out and how I'm doing with these goals. Hopefully you will see more posts from me and are still inspired by the projects I create.
Thanks for sticking with me.
Ezlie
Feb 21, 2015
I AM A CREATIVE PERSON!!
This week I was inspired by THIS VIDEO from Amy Tangerine - about adding creative touches to a planner.
Let me briefly share a bit about my planner journey. I am new to planners and the planner community. I absolutely love the beauty and functionality combination that the planner provides. I struggled though with the idea of having the plan ahead and record everything....I'm not that type of person when it comes to everyday activities. Besides a full monthly calendar view to mark appointments on, I really don't plan much else. I do make a lot of lists. And I do keep track of things for work. So I really was trying to see
 how I can make a planner work for me. I almost splurged on planner stamps, of course - but I resisted. I felt I could just draw some of the small icons and I wouldn't use all that came in most of the sets. Anyway, I made up my own planner since I couldn't justify the cost of the filofax or the kate spade planners. Plus, I'm a newbie and just getting into it. I didn't even know what things I would write in my planner.
So I had my planner (a binder from Staples) and I am tracking when I exercise, walk, and when I do my field service. I had the monthly calendar in there which I still put appointments and events, but that was it. I tried using the daily spreads to write what I ate or cooked, or how much money I spent on food - but I couldn't keep up with it on a daily basis. Plus, when I missed writing it...I felt - does it really matter? Why do I need to write this down? So I stopped.
I then started to keep track of the sleeping of Nathan, since we were trying the Ferber method to try to sleep train him. I wanted to see if he improved and document it for his baby album. So I started to doodle and play with the font of my writing as I was just writing the date and when he slept and how long he slept. I found this simple act of doodles and making the text look pretty, made it more enjoyable for me to look at and fun to document.
Then I came across Amy Tangerine's video, linked above. Her video was simple but the few words she said struck me. "Record events and things I've done", "Fun creative play for me...I can try new techniques, use my supplies", "make my days prettier, recording memories in one place...I can add stamping, watercoloring, doodles, and color".
This struck me because that was my struggle with planners. Decorating the days in advance didn't make sense to me - and things change. I like the idea of documenting the days after it happened. This is like scrapbooking, right?! Document life. And a planner lends itself to Project Life too - since you have a document of your days. Plus it seems easier to decorate when you know what happened, you can customize it to the event or activity. Additionally, I totally agreed with her when she said it's fun creative play - and being able to use techniques rather than typing or using an electronic device. I was struggling with trying to make 'pretty' notes on my ipad. I wanted to go paperless and have been for my work for over 2 years now. But I did feel that prettiness itch. I constantly doodle and change the color of my pens...just because. I like color and patterns and texture in almost anything I write on. So now I see this idea of a planner could be not so much to plan my days, but a creative space to have fun with techniques as Amy demonstrated and to document the days activities after they had happened.
Feeling this need to have a creative space and really almost anything involving paper to play with color and techniques makes me finally come to the realization that I AM A CREATIVE PERSON. I never would have said that before, but I see it now. I almost always have to customize or create something. I see a blank space and feel like I want to add something to it. I do have creative blocks when sometimes I don't feel 'in the mood' but I can feel the difference and during that period, I'm not me. My 'normal' is to be in that creative mode. I have now creative outlets around me and available to me that give me the chance to be creative everyday. Make something pretty everyday. And this makes me happy. Not only the process of making it pretty, but even just looking at what I've done makes me proud and feel good. I want to share what I've done. I want to encourage others to tap into their creativity and find an outlet. And if it can be something as simple as writing what you did that day or the day before, why not?! I haven't had the time to scrapbook or make cards as I used to since baby Nathan. So finding these new outlets that are in 'smaller doses' is something I am grateful for. I feel a bit more like myself. I don't feel like I'm missing anything. I get to use my supplies, try new techniques, and still reflect on the days of my life that brings joy. Oh what fun.
Are you a creative person?
Let me briefly share a bit about my planner journey. I am new to planners and the planner community. I absolutely love the beauty and functionality combination that the planner provides. I struggled though with the idea of having the plan ahead and record everything....I'm not that type of person when it comes to everyday activities. Besides a full monthly calendar view to mark appointments on, I really don't plan much else. I do make a lot of lists. And I do keep track of things for work. So I really was trying to see
So I had my planner (a binder from Staples) and I am tracking when I exercise, walk, and when I do my field service. I had the monthly calendar in there which I still put appointments and events, but that was it. I tried using the daily spreads to write what I ate or cooked, or how much money I spent on food - but I couldn't keep up with it on a daily basis. Plus, when I missed writing it...I felt - does it really matter? Why do I need to write this down? So I stopped.
I then started to keep track of the sleeping of Nathan, since we were trying the Ferber method to try to sleep train him. I wanted to see if he improved and document it for his baby album. So I started to doodle and play with the font of my writing as I was just writing the date and when he slept and how long he slept. I found this simple act of doodles and making the text look pretty, made it more enjoyable for me to look at and fun to document.
Then I came across Amy Tangerine's video, linked above. Her video was simple but the few words she said struck me. "Record events and things I've done", "Fun creative play for me...I can try new techniques, use my supplies", "make my days prettier, recording memories in one place...I can add stamping, watercoloring, doodles, and color".
This struck me because that was my struggle with planners. Decorating the days in advance didn't make sense to me - and things change. I like the idea of documenting the days after it happened. This is like scrapbooking, right?! Document life. And a planner lends itself to Project Life too - since you have a document of your days. Plus it seems easier to decorate when you know what happened, you can customize it to the event or activity. Additionally, I totally agreed with her when she said it's fun creative play - and being able to use techniques rather than typing or using an electronic device. I was struggling with trying to make 'pretty' notes on my ipad. I wanted to go paperless and have been for my work for over 2 years now. But I did feel that prettiness itch. I constantly doodle and change the color of my pens...just because. I like color and patterns and texture in almost anything I write on. So now I see this idea of a planner could be not so much to plan my days, but a creative space to have fun with techniques as Amy demonstrated and to document the days activities after they had happened.
Feeling this need to have a creative space and really almost anything involving paper to play with color and techniques makes me finally come to the realization that I AM A CREATIVE PERSON. I never would have said that before, but I see it now. I almost always have to customize or create something. I see a blank space and feel like I want to add something to it. I do have creative blocks when sometimes I don't feel 'in the mood' but I can feel the difference and during that period, I'm not me. My 'normal' is to be in that creative mode. I have now creative outlets around me and available to me that give me the chance to be creative everyday. Make something pretty everyday. And this makes me happy. Not only the process of making it pretty, but even just looking at what I've done makes me proud and feel good. I want to share what I've done. I want to encourage others to tap into their creativity and find an outlet. And if it can be something as simple as writing what you did that day or the day before, why not?! I haven't had the time to scrapbook or make cards as I used to since baby Nathan. So finding these new outlets that are in 'smaller doses' is something I am grateful for. I feel a bit more like myself. I don't feel like I'm missing anything. I get to use my supplies, try new techniques, and still reflect on the days of my life that brings joy. Oh what fun.
Are you a creative person?
Feb 17, 2015
video | 2015 Scrapbook Expo Tips - have fun and stay in budget!
CLICK HERE FOR THE 2015 SCRAPBOOK EXPO SHOW LIST
 The scrapbook expo is coming to town and most likely to a town near you too! Click the link above to get the dates and locations of the expo for this year.
I've been going to this expo almost every year for the last 12+ years. I've been pressed for time and had a crafting budget each time I've gone. I'd like to share with you a few tips from my experience to help you have an enjoyable experience, stay within budget, get supplies that you will actually use, and did I say stay within your budget? Check out my video below. The tips I mentioned are listed out here in my post. I hope this is helpful for you, especially if this may be your first time visiting the expo. Please let me know if you go to the expo and how much you enjoyed it. I'd love to read your comments about it.
TIP #1: Shop around online before the expo to get an idea of prices. See what is the 'normal' cost of paper, stickers, stamps, etc. That way when you're at the expo you'll know more for sure what is a good deal and what may not be a good deal. Also, if it's available online for a cheaper price - you'll know so you don't buy it at the expo. Here are a few online stores to check out.
SIMON SAYS STAMP
PAPER ISSUES
STUDIO CALICO
TIP #2: Look for coupons. You have to sign up for the expo newsletter on the scrapbook expo website in order to get coupons. They will email you with the coupons before the expo, so be sure to check your inbox before you leave. Read the entire coupon since there are usually limitations or certain amount you have to spend before the coupon could be redeemed. The website also will list nearby craft stores that may have a discount coupon for admission. Michael's also carry these. Call ahead of time to see if they have any before you make the trip.
TIP #3: Wear comfortable shoes and comfortable clothing. A light jacket if necessary - one that is light and can fit in your bag so you don't have to carry it. You will be bending down to look at things and possibly squeezing between people. You don't want to have any wardrobe malfunctions or mishaps. Be sure you're comfortable to shop and have your hands free not holding your jacket. You will get hot, especially if your expo is during the summer.
TIP #4: Bring water and snacks. There are booths with snacks there, but why spend your money on food when you can buy more paper?! Bring your own snacks and drink so you can continue to shop comfortably and not have to use your time getting food.
TIP #5: Bring a backpack or a large fabric shopping bag that fits 12x12 papers. It is much more enjoyable to shop with your hands free. Purses tend to fall off your shoulder or hit people or products hanging in the booth. Try to downsize your purse to be just your wallet and snacks. You can use the fabric bag to put your purchases in without having to have a bunch of plastic bags in your hands. If you plan on buying 12x12 paper, be sure your bag can fit it without bending your paper.
TIP #6: Bring cash - small bills. Most booths accept credit and debit cards but there are fees if your purchase is less that $10 or $15 dollars. Most scrapping products, like paper and buttons and such are less than $1. So having cash is nice for those small purchases. Plus you avoid the fees. Also, some booths have a separate register just for cash and you can get out of there much faster since most people do not bring cash. Cash can help you stay in your budget too.
TIP #7: Make a shopping list with your budget on it. I'll explain how to create this list so you don't get overwhelmed and hopefully don't buy things on impulse because it's pretty. You'll see so many cute things but you can't possibly buy it all. So have this list ready with your reminder of budget to help you control the "cute impulse shopping". Scroll down to see my suggestions for making a shopping list.
TIP #8: If possible, try not to bring small children. There is not much space for strollers and there are a bunch of small products hanging or on tables that could be easily knocked over by little hands. I think you will enjoy your experience more without the little ones. Plus standing watching a demonstration with a little one is definitely a challenge. Find yourself a sitter and see if you can pay with some cute paper. =)
TIP #9: Rolling shopping carts are not allowed - only for the classes. There is a baggage check available, if you happen to buy something heavy or if your bags are becoming a burden to carry. Use this baggage check if you need to.
 Shopping list tips:
These are tips and suggestions based on my own personal experiences. You are free to ignore me if you choose.
A shopping list helps you to do a few things:
Example: I'm scrapbooking my vacation to Hawaii. I have lots of Hawaiian or tropical papers, but no embellishments. So on my list I will put "tropical/Hawaiian embellishments".
This will prevent me from buying paper that I may not ever use or end up in my 'stash' that gets stuck there until our next vacation.
Another tip is to think about the items you may have said to yourself that "I'll need to get more of that", or "I just used the last of that". Replenish your stash of products you frequently use or have used up. These items that you 'need more of' are definitely worth price checking online first - so you can look for deals at the expo or know to wait to order online instead.
If you've been browsing the web and saw particular products like stamps sets, paper pads, stickers, etc. Jot down the brand name and product name, and if you can, jot down the price. That way you get to compare prices and remember the items you had on your online wish list and don't regret not getting it at the expo. Plus, you save on shipping by getting them at the expo. REMINDER: some new collections will not be available for retail sales at the time of the expo. Don't be disappointed if the newest collections are not there.
If you have a budget, write that down on the top of your list. If you feel the urge to splurge on something, you can see if you got most items on your list or not...and how much you have spent already. Then you can make a better decision if you are to splurge or not.
Of course, you can deviate from your list once you get there. But at least you have a guide of sorts and a reminder of what you 'need' vs what you may want - and you are reminded of your budget. This year, budget is especially important for me to stay within, so I will be extra picky on what I buy. But using these tips especially with my shopping list, has allowed me to leave the expo without spending more that $30-$40. Now that's truly something for us scrapbookers, right?!
Leave me a comment on your experience at the expo this year and any tips that you have from your own experiences. I hope I was able to help you stay in budget and have a fun shopping experience at the expo. Happy shopping!
I've been going to this expo almost every year for the last 12+ years. I've been pressed for time and had a crafting budget each time I've gone. I'd like to share with you a few tips from my experience to help you have an enjoyable experience, stay within budget, get supplies that you will actually use, and did I say stay within your budget? Check out my video below. The tips I mentioned are listed out here in my post. I hope this is helpful for you, especially if this may be your first time visiting the expo. Please let me know if you go to the expo and how much you enjoyed it. I'd love to read your comments about it.
CLICK HERE to see my original post on what to expect at the expo as well as my original tips from 2012. The tips I shared in today's post is more up to date with the 2015 Expo in mind.
TIP #1: Shop around online before the expo to get an idea of prices. See what is the 'normal' cost of paper, stickers, stamps, etc. That way when you're at the expo you'll know more for sure what is a good deal and what may not be a good deal. Also, if it's available online for a cheaper price - you'll know so you don't buy it at the expo. Here are a few online stores to check out.
SIMON SAYS STAMP
PAPER ISSUES
STUDIO CALICO
TIP #2: Look for coupons. You have to sign up for the expo newsletter on the scrapbook expo website in order to get coupons. They will email you with the coupons before the expo, so be sure to check your inbox before you leave. Read the entire coupon since there are usually limitations or certain amount you have to spend before the coupon could be redeemed. The website also will list nearby craft stores that may have a discount coupon for admission. Michael's also carry these. Call ahead of time to see if they have any before you make the trip.
TIP #3: Wear comfortable shoes and comfortable clothing. A light jacket if necessary - one that is light and can fit in your bag so you don't have to carry it. You will be bending down to look at things and possibly squeezing between people. You don't want to have any wardrobe malfunctions or mishaps. Be sure you're comfortable to shop and have your hands free not holding your jacket. You will get hot, especially if your expo is during the summer.
TIP #4: Bring water and snacks. There are booths with snacks there, but why spend your money on food when you can buy more paper?! Bring your own snacks and drink so you can continue to shop comfortably and not have to use your time getting food.
TIP #5: Bring a backpack or a large fabric shopping bag that fits 12x12 papers. It is much more enjoyable to shop with your hands free. Purses tend to fall off your shoulder or hit people or products hanging in the booth. Try to downsize your purse to be just your wallet and snacks. You can use the fabric bag to put your purchases in without having to have a bunch of plastic bags in your hands. If you plan on buying 12x12 paper, be sure your bag can fit it without bending your paper.
TIP #6: Bring cash - small bills. Most booths accept credit and debit cards but there are fees if your purchase is less that $10 or $15 dollars. Most scrapping products, like paper and buttons and such are less than $1. So having cash is nice for those small purchases. Plus you avoid the fees. Also, some booths have a separate register just for cash and you can get out of there much faster since most people do not bring cash. Cash can help you stay in your budget too.
TIP #7: Make a shopping list with your budget on it. I'll explain how to create this list so you don't get overwhelmed and hopefully don't buy things on impulse because it's pretty. You'll see so many cute things but you can't possibly buy it all. So have this list ready with your reminder of budget to help you control the "cute impulse shopping". Scroll down to see my suggestions for making a shopping list.
TIP #8: If possible, try not to bring small children. There is not much space for strollers and there are a bunch of small products hanging or on tables that could be easily knocked over by little hands. I think you will enjoy your experience more without the little ones. Plus standing watching a demonstration with a little one is definitely a challenge. Find yourself a sitter and see if you can pay with some cute paper. =)
TIP #9: Rolling shopping carts are not allowed - only for the classes. There is a baggage check available, if you happen to buy something heavy or if your bags are becoming a burden to carry. Use this baggage check if you need to.

These are tips and suggestions based on my own personal experiences. You are free to ignore me if you choose.
A shopping list helps you to do a few things:
- manage your spending
- keep your focus so you're not overwhelmed
- helps you get products you will use not stash or hoard
Example: I'm scrapbooking my vacation to Hawaii. I have lots of Hawaiian or tropical papers, but no embellishments. So on my list I will put "tropical/Hawaiian embellishments".
This will prevent me from buying paper that I may not ever use or end up in my 'stash' that gets stuck there until our next vacation.
Another tip is to think about the items you may have said to yourself that "I'll need to get more of that", or "I just used the last of that". Replenish your stash of products you frequently use or have used up. These items that you 'need more of' are definitely worth price checking online first - so you can look for deals at the expo or know to wait to order online instead.
If you've been browsing the web and saw particular products like stamps sets, paper pads, stickers, etc. Jot down the brand name and product name, and if you can, jot down the price. That way you get to compare prices and remember the items you had on your online wish list and don't regret not getting it at the expo. Plus, you save on shipping by getting them at the expo. REMINDER: some new collections will not be available for retail sales at the time of the expo. Don't be disappointed if the newest collections are not there.
If you have a budget, write that down on the top of your list. If you feel the urge to splurge on something, you can see if you got most items on your list or not...and how much you have spent already. Then you can make a better decision if you are to splurge or not.
Of course, you can deviate from your list once you get there. But at least you have a guide of sorts and a reminder of what you 'need' vs what you may want - and you are reminded of your budget. This year, budget is especially important for me to stay within, so I will be extra picky on what I buy. But using these tips especially with my shopping list, has allowed me to leave the expo without spending more that $30-$40. Now that's truly something for us scrapbookers, right?!
Leave me a comment on your experience at the expo this year and any tips that you have from your own experiences. I hope I was able to help you stay in budget and have a fun shopping experience at the expo. Happy shopping!
Feb 8, 2015
One Layer Card Video | Stencils, Embossing, and Glitter
It seems like forever since I've made a card video, but I do have some on my camera, just waiting to be edited. Here is my first card for 2015 when I was finally able to break out some new goodies I got from my last order from Stampin' Up!
It was so easy and quick to put this card together. I hope I inspire you to make a one layer card and break out your stencils or embossing powders.
Thanks for watching and stopping by.
It was so easy and quick to put this card together. I hope I inspire you to make a one layer card and break out your stencils or embossing powders.
Thanks for watching and stopping by.
Feb 1, 2015
I {heart} watercoloring

With my last video on watercoloring stamped images using reinkers, it got me to appreciate more that I like the soft look of watercolors. It helps too that it is easy and cheap to achieve a nice look. So I just went to Michaels and saw this set for $5! With a 40% coupon, it came out to be about $3 for this nice pallet of colors.
I broke out a brush and started using these right away on a scrapbook layout. It was simple and turned out good. I think I will need to next get some nicer brushes that are better quality, to get a better outcome. I know I will be using these a lot more. Plus I see the inspiration from Amy Tangerine who seems to use watercoloring to write phrases and quotes. I like the look and I think I have nice cursive writing which may look nice with watercolors.
 With my new adventures in scrapbooking, project life, planners, and cardmaking - I have many different avenues to practice and incorporate watercolors. Fun! I'm looking forward to it. I will be leaving this pallet out on my desk as a reminder to use them but also as inspiration. Isn't it just pretty to look at?!
Here's the scrapbook layout I made using these for the first time. I used some blue for the background at the top and bottom, and for the years 2012 and 2013, it was painted on. This layout was my first attempt of a mixed media look. I used Distress ink, stamps, and mists for the background. It was hard for me to not cover up the background I made. I think this is a layout that used the least amount of paper - ever! I like the way it turned out. Definitely different for me.
Thanks for stopping by. More projects with watercolor I'm sure will be coming!
Jan 1, 2015
Water color stamps with reinkers | Video Tutorial

Dec 7, 2014
Lawn Fawn Challenge with Video


It feels like forever since I've participated in a challenge. I saw this challenge on the Lawnscaping Blog, and thought it was a good challenge since I've really never made a white on white monochrome card before. Plus, I had my newer Lawn Fawn set that I've only used once - so I was happy to have the opportunity to use it again. So here is the card I made along with the video below. I did not do a voice over due to the ease of the card design.I really like the small pop of color I was able to incorporate by simply using colored pencils. Thanks for stopping by and I hope you enjoy my card design and the video below.
Supplies: Fog Ink - Simon Says Stamp; Feathered Friend Stamp - Lawn Fawn; Colored Pencils; 2 Way Glue Pen - Stampin' Up; Clear Glitter - Stampin' Up; Rhinestones - Stampin' Up; Stitched rectangle die - Simon Says Stamp
Nov 28, 2014
Scrapbook Video | Using stamps, stickers, and PL elements

Since my husband is a DJ and we all love music, we wanted to incorporate music as a theme for our baby boy's room. I plan on hanging this layout in his room, so the cassette tape background paper was perfect and it's been in my stash for years, so I was very happy to use it.
Check out my video below to see tthis page come together.
Thanks for stopping by and happy scrapping!
Nov 22, 2014
Stamp and Sequin GIVEAWAY!
I'm so grateful that I have reached 400 subscribers on my You Tube channel. All of your support means a lot to me and helps keep me motivated to keep on making videos for you to learn from, get inspired, and enjoy watching.
To enter, simply subscribe to my You Tube channel: madebyejp
and leave a comment on the video. (US residents only please) One winner will randomly be selected.
If I reach 450 subscribers, I will have another giveaway. Watch the video below to see the goodies up for grabs. Remember, to click Subscribe! Thanks for your support!
To enter, simply subscribe to my You Tube channel: madebyejp
and leave a comment on the video. (US residents only please) One winner will randomly be selected.
If I reach 450 subscribers, I will have another giveaway. Watch the video below to see the goodies up for grabs. Remember, to click Subscribe! Thanks for your support!
Nov 20, 2014
Scrapbooking Haul | getting back to scrapping - Video
It has definitely been a complete overhaul of my crafting mojo once my little one made his appearance. I was trying Project Life for the first time to document my pregnancy and during the summer we had a few weddings and other events that warranted card making. Not to mention the many new stamping products that were released during the summer months. All these changes contributed to the stall in my scrapbooking mojo. With Two Peas In a Bucket's closure, there was only two other scrapbooking You Tube channels I had subscribed to and not many videos were being uploaded. Needless to say, this influenced my inspiration to be more stamp and card making focused. I found myself purchasing and using stamps more than paper!
You Tube truly has played a huge role in my inspiration, since I don't watch TV (only sports with my hubby), and I watch videos as I am stamping or scrapping. I noticed that I had not made a layout in quite some time and my baby is already 3 1/2 months old and I haven't gotten his album started - yikes!! This was my wake up call. I realized though that I felt out of the loop in regards to the latest styles, trends, and products related to scrapbooking. I truly relied on Two Peas weekly videos to share new products and pages to inspire me. So I did a search on You Tube for scrapbooking channels. I came across a few suggested channels and started to watch. And of course, once you watch one, more suggested channels appear. So I found 4 new channels and I've been watching their videos now for this last week - I am inspired! Thank you ladies for your frequent uploads and great layouts!
I was moved to look through my supplies to remind myself what products I had. I cut down my papers that I've had for 3-5 years and made them into 6x6 so I can more readily use them for either cardmaking or scrapbooking. This helped me organize my stash and really see what papers I had that were inspiring to use with my current 'style' and needs for upcoming layouts. I then headed over to Joann's since they had a huge sale on pretty much the entire scrapbooking section. I controlled myself and got some products that caught my eye and I really feel I would use in the near future. I am really frugal and believe not to buy just because I like it, but because I will use it. Especially since my crafting space is much smaller - I have to be selective and cannot have a huge inventory.
With these new products and new videos I am happy to feel the mojo coming back. I will be creating more layouts with process videos to share with you. I hope you will enjoy them. For now, check out my haul video below. Thanks!
You Tube truly has played a huge role in my inspiration, since I don't watch TV (only sports with my hubby), and I watch videos as I am stamping or scrapping. I noticed that I had not made a layout in quite some time and my baby is already 3 1/2 months old and I haven't gotten his album started - yikes!! This was my wake up call. I realized though that I felt out of the loop in regards to the latest styles, trends, and products related to scrapbooking. I truly relied on Two Peas weekly videos to share new products and pages to inspire me. So I did a search on You Tube for scrapbooking channels. I came across a few suggested channels and started to watch. And of course, once you watch one, more suggested channels appear. So I found 4 new channels and I've been watching their videos now for this last week - I am inspired! Thank you ladies for your frequent uploads and great layouts!
I was moved to look through my supplies to remind myself what products I had. I cut down my papers that I've had for 3-5 years and made them into 6x6 so I can more readily use them for either cardmaking or scrapbooking. This helped me organize my stash and really see what papers I had that were inspiring to use with my current 'style' and needs for upcoming layouts. I then headed over to Joann's since they had a huge sale on pretty much the entire scrapbooking section. I controlled myself and got some products that caught my eye and I really feel I would use in the near future. I am really frugal and believe not to buy just because I like it, but because I will use it. Especially since my crafting space is much smaller - I have to be selective and cannot have a huge inventory.
With these new products and new videos I am happy to feel the mojo coming back. I will be creating more layouts with process videos to share with you. I hope you will enjoy them. For now, check out my haul video below. Thanks!
Nov 13, 2014
Scrapbook Layout | Stash Diving | Video Tutorial

So finally I'm able to put in an album some of my vacation photos from our trip to Hawaii in 2012. Yes, it's been almost 2 years! Thank goodness I had these pictures printed and ready to be 'scrapped'. The pictures I used are from Instagram and I used www.Kanvess.com to print them out. At 25 cents each, I felt it wasn't a bad deal. The pictures are all square and have a white border around them, which I like.
I hope you like the layout and the video. I was so glad to use some small pieces of cardstock and designer paper scraps, as well as some older products like my rub ons and old stickers!
I currently have 391 You Tube subscribers. If I hit 400 I will have a giveaway of some Heidi Swapp mini stamp sets. So if you haven't subscribed yet, please do! Thank you for your support.
Subscribe to:
Posts (Atom)